
|
Jupyter at Bryn Mawr College |
|
|
| Public notebooks: /services/public/dblank / CS110 Intro to Computing / 2015-Spring / Lectures | |||
1. Photoshop-like Functions
1.1 Green screen Effects - Chroma Key Compositing


%download http://blog.unem.de/wp-content/uploads/2012/05/11-Greenscreen-Clarissa-Knorr.jpg -f greenscreen1.jpg
/* @pjs preload="greenscreen1.jpg"; */

PImage img;

void setup() {
    img = loadImage("greenscreen1.jpg");
    // println("" + img.width + " x " + img.height)
    // 1920 x 1080
    // Resize to a more reasonable size:
    img.resize(img.width/10.0, img.height/10.0);
    // Make sketch size match:
    size(img.width, img.height);
}

void draw() {
    image(img, 0, 0);
    noLoop();
}
/* @pjs preload="greenscreen1.jpg"; */

PImage img;

void setup() {
    img = loadImage("greenscreen1.jpg");
    // println("" + img.width + " x " + img.height)
    // 1920 x 1080
    // Resize to a more reasonable size:
    img.resize(img.width/10.0, img.height/10.0);
    // Make sketch size match:
    size(img.width, img.height);
    // Add this to get pixel information into array:
    loadPixels(img);
}

void draw() {
    image(img, 0, 0);
    noLoop();
}

void mousePressed() {
    color pixel = img.pixels[mouseX + mouseY * img.width];
    println("Color: " + red(pixel) + ", " + green(pixel) + ", " + blue(pixel));
}
%download http://images.tenplay.com.au/~/media/News/National%20News/National%20News%20do%20not%20delete/News_National_showheader_480x210.jpg -f background1.jpg
/* @pjs preload="greenscreen1.jpg,background1.jpg"; */

PImage img;
PImage background;
PImage composite;

void setup() {
    img = loadImage("greenscreen1.jpg");
    img.resize(img.width/10.0, img.height/10.0);
    size(img.width, img.height);
    // get background:
    background = loadImage("background1.jpg");
    background.resize(img.width, img.height);
    // Now we image processing:
    composite = new PImage(img.width, img.height);
    loadPixels(background);
    loadPixels(img);
    loadPixels(composite);
    for (int i = 0; i < composite.width; i++) {
        for (int j = 0; j < composite.height; j++) {
            // if pixel is green, get it from background
            // else get it from foreground
            composite.pixels[i + j * composite.width] = img.pixels[i + j * img.width];
        }
    }
    updatePixels(composite);
}

void mousePressed() {
    color pixel = img.pixels[mouseX + mouseY * img.width];
    println("Color: " + red(pixel) + ", " + green(pixel) + ", " + blue(pixel));
}

void draw() {
    image(composite, 0, 0);
}
/* @pjs preload="greenscreen1.jpg,background1.jpg"; */

PImage img;
PImage background;
PImage composite;

void setup() {
    img = loadImage("greenscreen1.jpg");
    img.resize(img.width/10.0, img.height/10.0);
    size(img.width, img.height);
    // get background:
    background = loadImage("background1.jpg");
    background.resize(img.width, img.height);
    // Now we image processing:
    composite = new PImage(img.width, img.height);
    loadPixels(background);
    loadPixels(img);
    loadPixels(composite);
    for (int i = 0; i < composite.width; i++) {
        for (int j = 0; j < composite.height; j++) {
            color pixel = img.pixels[i + j * img.width];
            int r = red(pixel);
            int g = green(pixel);
            int b = blue(pixel);
            // if pixel is green, get it from background
            if (r < 55 && g < 170 && g > 145 && b > 50 && b < 80) {
                composite.pixels[i + j * composite.width] = background.pixels[i + j * img.width];
            } else {
                // else get it from foreground
                composite.pixels[i + j * composite.width] = pixel;
            }
        }
    }
    updatePixels(composite);
}

void mousePressed() {
    color pixel = img.pixels[mouseX + mouseY * img.width];
    println("Color: " + red(pixel) + ", " + green(pixel) + ", " + blue(pixel));
}

void draw() {
    image(composite, 0, 0);
}
Problem 1: fix the green screen effect above to make the background a nice, uninterrupted image without any green showing through.
Problem 2: Make your own "green screen" effect using your own pictures. Use a colored blanket, for example, as your background. Do something other than a news cast simulation. For example, put yourself in an unexpected place.
1.2 Obamicon
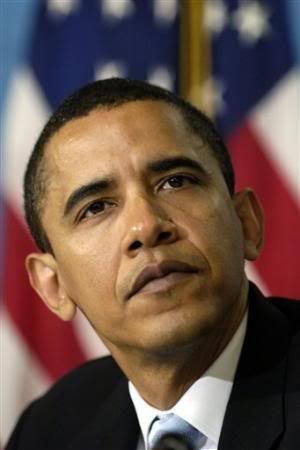

Problem 3: Take the regular picture of Obama and see if you can produce one programmatically that looks like the artistic version.
Problem 4: Take a pictures of yourself, and make it look like an Obamicon-ified version.
1.3 Edge Detection
https://processing.org/examples/edgedetection.html
There are a series of image processing techniques that can be accomplished by comparing a pixel to its surrounding 8 pixels.
A sample kernel for edge detection (high-pass filter):
| -1 | -1 | -1 |
| -1 | +9 | -1 |
| -1 | -1 | -1 |
%download https://processing.org/examples/moon.jpg
// The next line is needed if running in JavaScript Mode with Processing.js
/* @pjs preload="moon.jpg"; */

float[][] kernel = {{ -1, -1, -1},
                    { -1,  9, -1},
                    { -1, -1, -1}};

PImage img;

void setup() {
  size(640, 360);
  img = loadImage("moon.jpg"); // Load the original image
}

void draw() {
  image(img, 0, 0); // Displays the image from point (0,0)
  img.loadPixels();
  // Create an opaque image of the same size as the original
  PImage edgeImg = createImage(img.width, img.height, RGB);
  // Loop through every pixel in the image.
  for (int y = 1; y < img.height-1; y++) { // Skip top and bottom edges
    for (int x = 1; x < img.width-1; x++) { // Skip left and right edges
      float sum = 0; // Kernel sum for this pixel
      for (int ky = -1; ky <= 1; ky++) {
        for (int kx = -1; kx <= 1; kx++) {
          // Calculate the adjacent pixel for this kernel point
          int pos = (y + ky)*img.width + (x + kx);
          // Image is grayscale, red/green/blue are identical
          float val = red(img.pixels[pos]);
          // Multiply adjacent pixels based on the kernel values
          sum += kernel[ky+1][kx+1] * val;
        }
      }
      // For this pixel in the new image, set the gray value
      // based on the sum from the kernel
      edgeImg.pixels[y*img.width + x] = color(sum, sum, sum);
    }
  }
  // State that there are changes to edgeImg.pixels[]
  edgeImg.updatePixels();
  image(edgeImg, width/2, 0); // Draw the new image
  noLoop();
}
Problem 5: Try edge detection on one of your own images, but with a purpose. What is the use of edge detection?
1.4 Blurring
https://processing.org/examples/blur.html
A sample kernel for blurring (low-pass filter):
| 1/9 | 1/9 | 1/9 |
| 1/9 | 1/9 | 1/9 |
| 1/9 | 1/9 | 1/9 |
// The next line is needed if running in JavaScript Mode with Processing.js
/* @pjs preload="moon.jpg"; */

float v = 1.0 / 9.0;
float[][] kernel = {{ v, v, v },
                    { v, v, v },
                    { v, v, v }};

PImage img;

void setup() {
  size(640, 360);
  img = loadImage("moon.jpg"); // Load the original image
}

void draw() {
  image(img, 0, 0); // Displays the image from point (0,0)
  img.loadPixels();

  // Create an opaque image of the same size as the original
  PImage edgeImg = createImage(img.width, img.height, RGB);

  // Loop through every pixel in the image
  for (int y = 1; y < img.height-1; y++) {   // Skip top and bottom edges
    for (int x = 1; x < img.width-1; x++) {  // Skip left and right edges
      float sum = 0; // Kernel sum for this pixel
      for (int ky = -1; ky <= 1; ky++) {
        for (int kx = -1; kx <= 1; kx++) {
          // Calculate the adjacent pixel for this kernel point
          int pos = (y + ky)*img.width + (x + kx);
          // Image is grayscale, red/green/blue are identical
          float val = red(img.pixels[pos]);
          // Multiply adjacent pixels based on the kernel values
          sum += kernel[ky+1][kx+1] * val;
        }
      }
      // For this pixel in the new image, set the gray value
      // based on the sum from the kernel
      edgeImg.pixels[y*img.width + x] = color(sum);
    }
  }
  // State that there are changes to edgeImg.pixels[]
  edgeImg.updatePixels();

  image(edgeImg, width/2, 0); // Draw the new image
  noLoop();
}
Problem 6: Perform blurring on one of your own images. Why might this be useful?
Bonus: combine two of the photoshop-like effects in a single image.