
|
Jupyter at Bryn Mawr College |
|
|
| Public notebooks: /services/public/dblank / CS110 Intro to Computing / 2015-Spring / Lectures | |||
1. Robot Control
For this assignment, we will write Java code in Processing to control a simulated robot.
The robot can be seen from above in its 2D contained world:
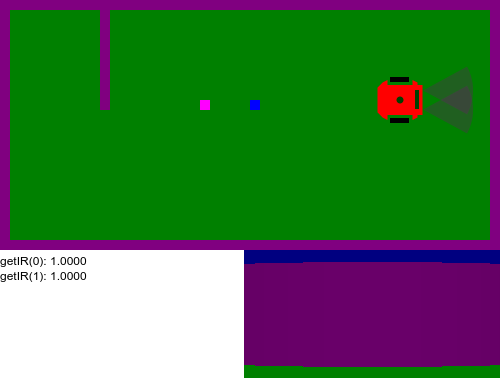
The robot is very simple, but can be programmed to do many things.
1.1 Sensors
The simulated robot has the following methods and properties:
- getIR(VALUE) - where VALUE is 0 for right/front, 1 for left/front; returns 0 to 1
- takePicture() - returns a PImage
- stalled - is a boolean value (
trueorfalse)
IR stands for "infrared". There are two simulated IR sensors on the front of the robot. They return values between 0 and 1. 1 means that nothing has been detected, and anything less means that there is an obstacle in front of the sensor. These aren't very good sensors (the same kind of inexpensive sensors in restrooms for detecting when to flush, and when to dispense paper towels). Example:
if (this.getIR(0) < 1.0) {
    // object on right, front
}
if (this.getIR(1) < 1.0) {
    // object on left, front
}
takePicture() returns a PImage object. We will explore those in the next assignment.
stalled is a boolean property of the robot. Example:
if (this.stalled) {
    // robot can't move
}
1.2 Movements
The simulated robot has the following methods for moving the robot:
- forward(VALUE) - VALUE should be between 0 and 1.0, or larger for small FPS
- backward(VALUE) - VALUE should be between 0 and 1.0, or larger for small FPS
- turn(VALUE) - VALUE could be between .01 and .1 (left); negative to turn right
- stop() - make the robot stop both turning and translating. Same as forward(0), turn(0)
As with sensors, when you refer to any of these, you need to preface with them with this. Examples:
this.forward(1.0);
this.backward(1.0);
this.turn(.01);
this.stop();
We put together sensing and movement to create a robot brain.
1.3 The Robot Brain
To control a robot, you need to use a special class. However, we want to define a method called brain in this class. In order to do this, we extend the class.
The class Robot exists. We extend it by defining a new class called MyRobot that has its own constructor and method brain.
class MyRobot extends Robot {
    MyRobot(float x, float y, float d) {
        super(x, y, d);
    }

    void brain() {
        ...
    }
}
Thus, to make a robot run around in the simulated world, we need to:
- define our robot class, by extending the existing Robot class
- create an instance of our class
- add the robot to the simulated world
- call
world.update()repeatedly
A setup() function might look like this:
void setup() {
    // Set up canvas 500, 250 for World, 128 for camera:
    size(500, 250 + 128);
    // Set rate so it doesn't overwhelm your browser:
    frameRate(10);
    // Create a simulated world:
    world = new World(500, 250);
    // Create robot, and add to world:
    robot = new MyRobot(400, 100, 0);
    world.addRobot(robot);
}
And a draw() function might look like this:
void draw() {
    // Clear:
    background(255);
    // Run simulation for one step:
    world.update();
}
1.4 Finite State Machine
To program the robot, we will use a technique very similar to how you programmed your objects from last week. This is called a Finite State Machine or FSM.
An FSM can be represented by circles (states) and arrows that take you from one state to another based on some event or property. For example, example the following FSM:
In English that says:
- if you are in the "start turn left", then:
- start timer
- goto "turn left" state
- if you are in the "turn left" state
- decrease timer
- if timer < 0, goto "forward" state
- if you are in "forward" state:
- if stalled, goto "backward" state
- if you are in "backward" state
- if stalled, goto "forward" state
Here is that same algorithm in Java, and shown starting in "start turn left":
class MyRobot extends Robot {
    MyRobot(float x, float y, float r) {
        super(x, y, r);
        this.state = "start turn left";
    }

    void brain() {
        float speed = 3.0;
        if (this.state == "backward") {
            if (this.stalled) {
                this.state = "forward";
                this.forward(speed);
            } else {
                this.backward(speed);
            }
        } else if (this.state == "forward") {
            if (this.stalled) {
                this.state = "backward";
                this.backward(speed);
            } else {
                this.forward(speed);
            }
        } else if (this.state == "start turn left") {
            this.time = 62;
            this.state = "turn left";
        } else if (this.state == "turn left") {
            if (this.time < 0) {
                this.turn(0);
                this.state = "forward";
            } else {
                this.turn(.05);
                this.time -= 1;
            }
        } else if (this.state == "turn right") {
            this.turn(-.05);
        }
    }
}
To run the robot simulation in Jupyter or in your down downloaded Processing, you will need the following three files:
In Jupyter, you can get those files with the %download magic:
%download http://jupyter.cs.brynmawr.edu/hub/dblank/public/CS110%20Intro%20to%20Computing/2015/Lectures/Robot.pde
%download http://jupyter.cs.brynmawr.edu/hub/dblank/public/CS110%20Intro%20to%20Computing/2015/Lectures/Hit.pde
%download http://jupyter.cs.brynmawr.edu/hub/dblank/public/CS110%20Intro%20to%20Computing/2015/Lectures/World.pde
And then simply use the %include magic as shown below.
For the downloaded Processing, simple click on the files, and save them to your computer. Paste them into new tabs in the Processing program. For example, create a tab called "Robot" and paste the code from Robot.pde into it. Create tabs for "Hit" and "World".
Finally, let's run an example. Notice that you can also click and drag the robot:
- drag left to move forward
- drag right to move backward
- drag up to turn left
- drag down to turn right
%include Robot.pde
%include Hit.pde
%include World.pde

Robot robot;
World world;
int mx, my;

void mousePressed() {
    mx = mouseX;
    my = mouseY;
}

void mouseDragged() {
    robot.forward((mouseX - mx)/100.0);
    robot.turn(-(mouseY - my)/1000.0);
}

void mouseReleased() {
    //robot.stop();
    robot.state = "stop";
}

class MyRobot extends Robot {
    MyRobot(float x, float y, float r) {
        super(x, y, r);
        this.state = "start turn left";
    }

    void brain() {
        PImage pic = this.takePicture();
        // Show pic on canvas:
        image(pic, 500 - 256, 250);
        fill(0);
        text("getIR(0): " + nf(this.getIR(0), 1, 4), 0, 265);
        text("getIR(1): " + nf(this.getIR(1), 1, 4), 0, 280);
        text("stalled: " + this.stalled, 0, 295);
        text("state: " + this.state, 0, 310);
        text("time: " + this.time, 0, 325);
        float speed = 3.0;
        if (this.state == "backward") {
            if (this.stalled) {
                this.state = "forward";
                this.forward(speed);
            } else {
                this.backward(speed);
            }
        } else if (this.state == "forward") {
            if (this.stalled) {
                this.state = "backward";
                this.backward(speed);
            } else {
                this.forward(speed);
            }
        } else if (this.state == "start turn left") {
            this.time = 62;
            this.state = "turn left";
        } else if (this.state == "turn left") {
            if (this.time < 0) {
                this.turn(0);
                this.state = "forward";
            } else {
                this.turn(.05);
                this.time -= 1;
            }
        } else if (this.state == "turn right") {
            this.turn(-.05);
        } else if (this.state == "stop") {
            //this.stop();
        }
    }
}

void setup() {
    // Set up canvas 500, 250 for World, 128 for camera:
    size(500, 250 + 128);
    // Set rate so it doesn't overwhelm your browser:
    frameRate(10);
    // Create a simulated world:
    world = new World(500, 250);
    world.addWall(100, 0, 110, 110);
    world.addBox(200, 95, 210, 170, color(255, 0, 255));
    world.addBox(250, 95, 260, 130, color(255, 255, 0));
    world.addBox(300, 190, 310, 240, color(255, 128, 0));
    // Create robot, and add to world:
    robot = new MyRobot(400, 100, 0);
    world.addRobot(robot);
}

void draw() {
    // Clear:
    background(255);
    // Run simulation for one step:
    world.update();
}
Your assignment is to write a program that will drive your robot forward into the "garage" and stop. The garage is the upper, left-hand corner of the world. You can use this.time when turning and moving backward, but you should use your sensors when moving forward.